Showing posts with label crafts. Show all posts

Monday, May 18, 2015

My Crochet Projects

As I mentioned before, I've been getting into crochet for quite some time. There are just so many different things I want to make. I'm slowly working through a list, but here are some of the things I've made so far.....


Beanies


Friday, June 14, 2013

Whimseybox Review

I've been subscribed to Whimseybox (a monthly craft box) for a few months. I actually cancelled my subscription for a number of reasons, which I will explain. First, I'll give a rundown of the service and boxes.


Tuesday, March 12, 2013

Whimseybox - Feb 2013

Whimseybox is a monthly craft box. You get a box for $15, mailed to you every month with a project inside (as long as you're subscribed to the service). Keep reading to find out more.


Monday, February 11, 2013

Sewn Valentine's Tote Bag

This weekend I took on a different project than usual. Normally, I work with yarn to make all kinds of loom knit items. This time, I decided to do some work with my sewing machine. I found a pattern for a basic sewn tote bag and I knew right away that I wanted to make it. So, I took myself over to Jo-Ann and picked out some fabric. I picked a bright pink, a deep purple with golden dots, and a pale pink with white hearts.

It's a reversible tote with a pocket on the inside.


I love this bag! Even though it can be considered a Valentine's bag, I'm perfectly fine using it throughout the year. I think it will be perfect for day trips, carrying books/magazines, holding my knit projects, and many other things. When I was younger, I would've considered this the perfect bag to bring along on sleepovers. I wish I could've had it then!


Bag laying flat.


This is the little pocket on the inside.


Here's the strap. It's nice and sturdy.


Don't you love this fabric? It was 50% off! I love heart patterns and this one is very subtle and delicate.


This project was a lot of fun. I enjoyed it so much that I went back and got more fabric for additional totes like this! These would make great gifts and there are so many options for color combos that I could make a million of them!


Sunday, July 29, 2012

My Craft: Working with Looms

If you've visited my shop or followed me on some sort of social media account (Twitter, Facebook, blog, etc) you probably already know that I make things on looms as well as sell them. I started out last year knitting on looms and now I also weave on looms. I've gathered some looms, yarn, and tools to show you everything I use in order to make the pieces you see in my shop.


I use all kinds of yarn for my projects - different colors, textures, and sizes.


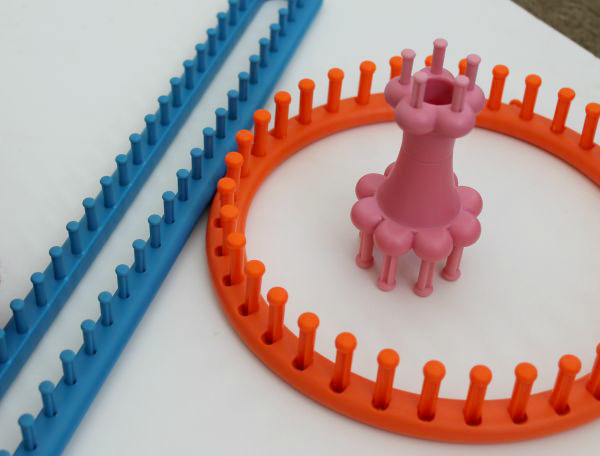
Long loom, round loom, and spool loom.
These are just a few of the looms I use to make my pieces. 


A cotton tote bag in progress on a round loom.


A woven project using cotton yarn and the Martha Stewart loom.
This will be a eyeglass case like this one.


Using looms is a lot of fun. I make all kinds of different projects on them. Bags, scarves, eyeglass cases, headbands, shawls, and coasters - I have made all of these and have them for sell in my shop. I'm always looking at new patterns and learning new techniques for my looms. Any questions about this craft? Just ask!


Find me here:
Shop: SparkleKnit
Facebook: Sparkleknit
Pinterest: Missaf23

Saturday, July 14, 2012

DIY: Melted Crayon Art


Who doesn't love a fun and easy art project? I love to paint and draw but this project is something anyone can do. You really don't need any artistic abilities whatsoever. As long as you can handle a hot glue gun and a hairdryer, you're good to go!


Materials

  • Canvas (I used 18x24 Stretched Canvas)
  • Crayons (I bought 2 64-packs. The amount depends on your size of canvas)
  • Hot glue gun + glue
  • Hair dryer
Make sure to protect the surface you're working on. Mine splattered a little here and there. Also you'll want to use something to hold the canvas upright. I have an easel but you could even find something to lean it against.
For the crayons, I picked out the browns, grays, blacks, etc. and doubled up most of the other colors. I didn't use all of them. 


To Create Your Masterpiece:
There are really only two steps to this project once you have everything set up. 

1. Glue the crayons to the top of the canvas pointing down. You might want to line them up before you start and in the color scheme you want them to be.


Ready to go!


2. Use a hair dryer to melt the crayons. 


That's how simple it is! It might take awhile to melt the crayons enough to achieve the effect you want. For mine it took about 30 minutes. There isn't a specific way to use the hair dryer - just point it downward!

I love how this turned out and I'll be hanging it up on my wall immediately!

Wednesday, June 20, 2012

New: Loom Woven Pieces

I admit, I've neglected this blog for awhile and it's because I have been focusing on my other blog. But now I have an update about my shop! I started loom weaving awhile ago and have been adding in woven pieces to my inventory lately. You can see a few of them below:


Bottom right - Kitchen cloth set

These items are so fun to make and ideal for summer. I plan to make more and offer more color choices but I'm still loom knitting as well. I have two knitted bags that I'm working on and will be listed soon.
For now, I'm letting my scarf listings expire - they will return this fall along with more colorful scarves and headbands!

How do you like the new items? Let me know in the comments!

Sunday, May 13, 2012

DIY Craft Storage

I have quite a bit of supplies I actively use for my Etsy shop. I have a plastic drawer set to hold most of them but the important part of my storage solution is the organization within it. There are all kinds of drawer organizers you can buy, but the best option is to use something you already have. 
Shoe boxes happen to be something everyone has lying around because they are useful for many things. For this project I chose a narrow shoebox to house ribbon, hemp cord, and small pattern booklets.


This plain shoebox wasn't very attractive so I used some gift wrap, scissors, and tape to dress it up a little. 


I didn't make it look perfect but I'm okay with that. They are tons of ways to decorate a shoebox. You can use glue, tape, ribbon, gift wrap, wallpaper, shelf paper, construction paper, fabric, washi tape, tissue paper, stickers, etc. You can really get creative with it or just keep it simple but it adds a little something to your storage area inexpensively (minus the shoes it came with!).

Monday, April 30, 2012

DIY Hemp Coasters


I made these coasters last December after finding a tutorial for them online. They required few supplies and I love how they turned out.


Supplies:


  1. Hemp cord
  2. Cork circles or cork sheet
  3. Glue gun (hot glue)
  4. Scissors
  5. Ribbon (optional)

I bought a sheet of cork because I couldn't find the pre-cut circles anywhere. To make circles I used a candle jar and a utility knife to cut the cork into the right size and shape. If you can find the cork circles this project will be easier and faster (and will look neater and more clean in the end).

Once I had my circles done, I took my hemp cord and started to glue it down in small sections starting from the outer edge of the circle and working my way to the middle. Once I got to the middle I snipped the cord with scissors and tucked that last piece in.

Since I had to cut the circles myself, the edges looked a little rough so I glued down some ribbon to make a more finished look. (I didn't get a picture of the completed coasters unfortunately)

This is a very simple project that can be completed in an afternoon. Make sure to cover your surface before starting this project. Take your time and lay the cord onto the cork neatly and tightly so that you don't see the glue or any gaps.

Happy Crafting!


Find me here
Facebook: Sparkleknit
Pinterest: SparkleKnit


Thursday, March 22, 2012

DIY: T-shirt Yarn


Making t-shirt yarn is a simple and easy project using materials you already have on hand. My last blog post featuring the knitted coasters I listed on my etsy shop were made with recycled t-shirt yarn. All you need is a flat surface, a t-shirt without side seams, and scissors.

ShareThis